Tie-dyeing has experienced a significant revival, becoming a popular DIY fashion trend, especially with the rise of work-from-home lifestyles and social media influence.
Insight Art Studio offers tutorials for techniques like spiral and fan designs on cotton fabrics, making tie-dye accessible for all skill levels.
TieDyeYourSummer.com provides comprehensive guides, from basic patterns to advanced techniques, inspiring creativity and offering a wealth of tie-dye knowledge.
What is Tie-Dye?
Tie-dye is an expressive and ancient art form involving folding, twisting, pleating, or crumpling fabric and binding it, then applying dye to create unique patterns.
Historically rooted in traditions like Japanese Shibori and African tie-dye, the process resists dye penetration, resulting in vibrant and unpredictable designs.
Modern tie-dye, popularized in the 1960s, has seen a resurgence, fueled by DIY culture and a desire for personalized fashion. It’s a versatile technique applicable to various fabrics, notably cotton, offering endless creative possibilities.
The Resurgence of Tie-Dye Fashion (2025-2026)
Tie-dye has exploded in popularity, becoming the “unofficial WFH uniform” since 2025, driven by remote work trends and a desire for comfortable, expressive clothing.
Social media, particularly platforms like Instagram, showcase influencers sporting tie-dye, further amplifying its reach and inspiring DIY projects.
This revival isn’t just about aesthetics; it reflects a broader movement towards sustainable fashion, upcycling, and personalized style, making tie-dye a relevant and enduring trend.

Materials Needed for Tulip Tie-Dye
Essential supplies include white cotton fabrics, Tulip One-Step Dye Kits, rubber bands or string, gloves, and a plastic drop cloth for surface protection.
Tulip One-Step Dye Kits
Tulip One-Step Dye Kits are incredibly user-friendly, eliminating the need for pre-mixing dyes or using soda ash, making tie-dyeing accessible for beginners and experienced crafters alike.
These kits typically contain pre-measured dye bottles in a variety of vibrant colors, allowing for easy application directly onto the fabric. The one-step formula simplifies the process, reducing mess and ensuring consistent results.
Kits often include gloves and instructions, providing everything needed to create stunning tie-dye designs without extensive preparation or specialized knowledge.
White Cotton Fabrics (T-shirts, Tote Bags, etc.)
White cotton fabrics are the ideal canvas for Tulip tie-dye, as the dye molecules bind most effectively with natural fibers like cotton, resulting in vibrant and long-lasting colors.
Common choices include t-shirts, tote bags, socks, and other cotton apparel or accessories. Pre-washed fabrics are essential for optimal dye absorption, removing sizing or finishes that could hinder the process.
Lighter colored fabrics, especially white, provide the most striking contrast and allow the dye colors to truly pop, showcasing the intricate patterns created through tie-dye techniques.
Rubber Bands or String
Rubber bands or string are crucial tools for creating the distinctive patterns in tie-dye, acting as resists that prevent the dye from penetrating certain areas of the fabric.
The tightness and placement of these bands or string dictate the final design, with tighter bindings resulting in more defined patterns and crisp lines.
Various techniques utilize different binding methods – spirals, crumples, bullseyes, and stripes all rely on strategic use of rubber bands or string to achieve their unique aesthetic.
Gloves
Gloves are an absolutely essential safety precaution when working with Tulip dyes, protecting your skin from potential irritation or staining caused by the concentrated dye solutions.
Direct skin contact with dyes can lead to discoloration, allergic reactions, or simply an unwanted and difficult-to-remove tint, making gloves a non-negotiable part of the process.
Disposable gloves, typically made of nitrile or latex, are readily available and provide a reliable barrier, ensuring a safe and enjoyable tie-dyeing experience for all creators.
Plastic Drop Cloth or Protective Surface
Protecting your work surface is crucial when tie-dyeing with Tulip dyes, as the liquids can easily stain or damage furniture, floors, and other materials.
A plastic drop cloth, a large sheet of plastic sheeting, provides an impermeable barrier, catching any drips or spills and preventing them from reaching the underlying surfaces.
Alternatively, covering your workspace with old newspapers or a dedicated craft mat can also offer adequate protection, ensuring a clean and worry-free tie-dyeing session.
Basic Tie-Dye Techniques
Classic methods like the spiral, crumple, bullseye, stripes, and folds are excellent starting points for tie-dye beginners, offering diverse design possibilities.
I Love to Create provides a photo tutorial for the easy crumple technique, while TieDyeYourSummer.com details all these foundational patterns.
The Spiral Technique
The spiral technique is arguably the most iconic tie-dye pattern, creating a mesmerizing circular design. Begin by pinching the center of your fabric and twisting it into a tight, flat spiral, resembling a cinnamon roll.
Secure the spiral tightly with multiple rubber bands, dividing it into pie-shaped sections. Apply different dye colors to each section, ensuring the dye penetrates the fabric thoroughly.
Insight Art Studio demonstrates this technique effectively, and TieDyeYourSummer.com offers detailed instructions for achieving a vibrant, well-defined spiral pattern on t-shirts or other cotton materials.
The Crumple Technique
The crumple technique is celebrated for its effortless, organic aesthetic, making it perfect for beginners. Simply crumple your fabric randomly, creating a multitude of folds and creases.
Secure the crumpled fabric with rubber bands to maintain the folds, though this isn’t strictly necessary. Apply dye liberally across the entire surface, allowing the colors to blend and create unique patterns.
I Love to Create provides a helpful photo tutorial for mastering this classic method, resulting in a beautifully textured and unpredictable tie-dye design on shirts and fabrics.
The Bullseye Technique
The bullseye technique creates concentric circles of color, offering a visually striking design. Pinch the fabric at the point where you want the center of the bullseye to be.
Pull the fabric upwards, creating a cylindrical shape, and secure it tightly with rubber bands at intervals along the length. This divides the fabric into sections.
Apply different colors to each section between the rubber bands, ensuring the dye penetrates the fabric. This results in a classic bullseye pattern when the bands are removed.
Stripes and Folds
Creating stripes is one of the simplest tie-dye techniques, perfect for beginners. Fold the fabric accordion-style, like creating a paper fan, ensuring neat and even creases.
Secure the folded fabric tightly with rubber bands at regular intervals. The spacing of the rubber bands determines the width of the stripes in the final design.
Apply dye along the exposed sections between the rubber bands, using different colors for varied stripe patterns. This method offers a clean and classic striped effect.
Advanced Tie-Dye Patterns
Explore intricate designs like Shibori-inspired patterns, delicate dots and circles, or the dynamic fan technique for unique, artistic tie-dye creations.
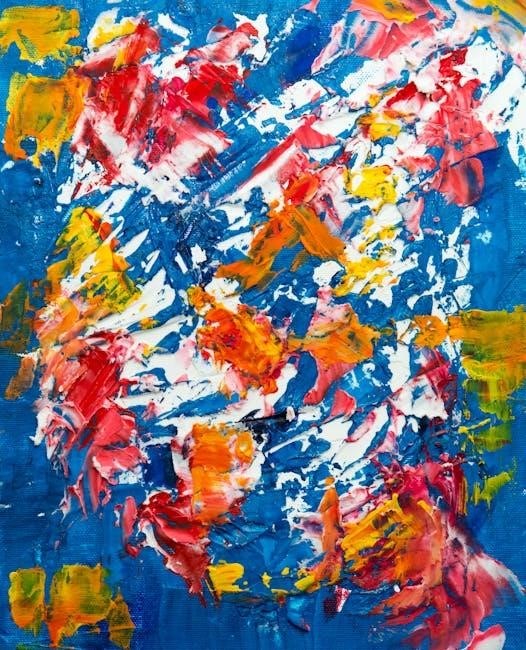
Abstract tie-dye offers endless possibilities, blending colors and techniques for truly one-of-a-kind textile art.
Experimentation is key to mastering these advanced methods and achieving stunning visual results.
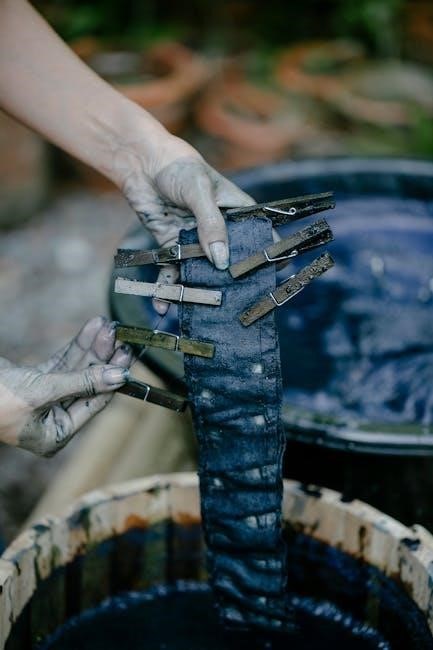
Shibori Inspired Patterns
Shibori, a traditional Japanese dyeing technique, offers a beautiful foundation for advanced tie-dye patterns. Arimatsu, a town central to Japan’s tie-dye history, showcases centuries of expertise in this art form.
Mimic the intricate designs of Shibori by employing techniques like binding, stitching, folding, twisting, and compressing fabric. These methods create unique, textured patterns with a distinctly Japanese aesthetic.
Indigo blue navy ornamental circles are a classic Shibori motif, achievable through careful binding and dyeing. Explore various Shibori styles to add depth and artistry to your tie-dye projects.
Dots and Circles
Creating dot and circle patterns in tie-dye is surprisingly versatile and accessible. One method involves pinching and tying off small sections of fabric with rubber bands, resembling a dotted effect.
For larger circles, gather fabric into a cylindrical shape and bind it tightly with string or rubber bands. Experiment with varying the size and placement of these bound areas for diverse designs.
Abstract tie-dye techniques often feature scattered dots and circles, adding a playful and organic feel. Consider layering different colors to enhance the visual impact of these circular motifs.
Fan Technique
The fan technique creates a radiating pattern reminiscent of a handheld fan. Begin by folding the fabric accordion-style, resembling pleats, and then securing it tightly with rubber bands along its length.
Insight Art Studio tutorials demonstrate this method effectively, showcasing how different dye applications can yield unique fan designs. Varying the width of the pleats impacts the final look.
Experiment with color placement – applying darker shades at the base and lighter hues towards the edges enhances the fan’s visual depth. This technique works beautifully on t-shirts and tote bags.

Preparing Your Fabric for Dyeing
Pre-washing removes sizing, ensuring even dye absorption. Soda ash soaking (optional) prepares cotton for vibrant, lasting color, enhancing the dyeing process significantly.
Pre-Washing the Fabric
Before embarking on your tie-dye adventure, pre-washing your chosen fabric – typically white cotton like t-shirts or tote bags – is absolutely crucial. This seemingly simple step dramatically impacts the final outcome of your project. Fabrics often contain sizing agents applied during manufacturing, which prevent the dye from properly penetrating the fibers.
Removing these substances ensures the dye adheres evenly, resulting in vibrant, long-lasting colors. Use a mild detergent and avoid fabric softeners, as they can also interfere with dye absorption. A thorough rinse and complete drying are essential before proceeding to the next stage of the tie-dye process.
Soaking in Soda Ash (Optional)
While not always essential, soaking your fabric in a soda ash solution can significantly enhance the vibrancy and colorfastness of your tie-dye project, particularly when using fiber reactive dyes. Soda ash, or sodium carbonate, raises the pH of the fabric, creating an optimal environment for the dye to bond with the cotton fibers.
To prepare the solution, dissolve soda ash in warm water, ensuring it’s fully dissolved before submerging the pre-washed fabric. Allow the fabric to soak for approximately 20 minutes, then wring out the excess liquid before proceeding with the dyeing process.
The Dyeing Process with Tulip Dyes
Tulip One-Step dyes simplify the process; apply the dye directly to the fabric, ensuring thorough saturation for vibrant results, and experiment with multiple colors!
Ensure dye penetrates by generously applying it to all areas of the fabric, working it into the fibers for optimal color absorption.
Applying the Dye
With Tulip One-Step dyes, application is remarkably straightforward, eliminating the need for pre-mixing or separate soda ash solutions. Generously apply the dye directly onto the fabric, focusing on fully saturating each section of the tied design.
For vibrant and consistent color, ensure the dye penetrates deep into the fibers. Utilize the applicator bottles provided in Tulip kits for precise control, or carefully pour dye onto the fabric.
Don’t be afraid to layer colors, creating unique blends and gradients. Remember to work in a well-ventilated area and protect your surfaces with a plastic drop cloth.
Ensuring Dye Penetration
Optimal dye penetration is crucial for achieving bold, long-lasting colors in your tie-dye creations. Gently massage the dye into the fabric, working it into the folds and creases created by your chosen tie-dye technique.
For tightly bound areas, use a brush or applicator tip to ensure the dye reaches all the fabric fibers. Allowing sufficient dwell time – letting the dye sit – is also key.
Remember, fully saturated fabric yields the most vibrant results, so don’t skimp on the dye application! This step is vital for a successful and visually stunning tie-dye project.
Dyeing Multiple Colors
To achieve vibrant, multi-colored tie-dye designs, apply each dye color to separate sections of the fabric, carefully avoiding overlap if distinct color blocks are desired.
For blended effects, allow colors to slightly bleed into each other, creating unique gradients and patterns. Consider the color wheel for harmonious combinations.
Remember to work quickly to prevent colors from drying before blending, and use separate applicators for each dye to maintain color purity and avoid unwanted mixing.
Dye Setting and Rinsing
Allowing the dye to set fully is crucial for vibrant, lasting color; then, rinse thoroughly under cold water until the water runs clear, followed by washing.
Allowing the Dye to Set
After applying the Tulip dyes to your fabric, the crucial next step is allowing sufficient time for the dye to properly set into the fibers. This process ensures vibrant, long-lasting colors and prevents significant fading during subsequent washes. Generally, a setting time of at least six to eight hours is recommended, but for the most intense results, consider letting the dye sit for a full 24 hours.
During this period, keep the dyed item in a sealed plastic bag or container to maintain moisture, which aids in the dye bonding process. Avoid exposing it to direct sunlight or heat, as these can negatively impact the color outcome.
Rinsing Under Cold Water
Once the dye has set for the recommended time, begin the rinsing process with cold water. This is a critical step to remove excess dye and prevent colors from bleeding or staining other areas of the fabric. Start by rinsing the item under a running tap, gently squeezing and agitating to release the dye.
Continue rinsing until the water runs clear, which may take several minutes. Avoid using warm or hot water, as this can cause the dye to set prematurely and fade the colors. Patience is key during this stage!
Washing the Dyed Item
After thoroughly rinsing, it’s time to wash your tie-dyed creation! Machine wash the item separately in cold water with a mild detergent. This initial wash is crucial for removing any remaining loose dye and preventing color transfer to other garments.
Avoid using bleach or harsh chemicals, as these can damage the fabric and fade the vibrant colors. Tumble dry on a low setting or, ideally, hang to dry to preserve the design and prevent shrinkage.

Troubleshooting Common Tie-Dye Issues
Uneven dyeing, color bleeding, or fading can occur; using cold water, mild detergent, and avoiding bleach helps maintain vibrant, lasting tie-dye results.
Uneven Dyeing
Achieving consistent color throughout your tie-dye project can be tricky. Uneven dyeing often stems from insufficient dye penetration, especially in tightly bound areas. Ensure the fabric is thoroughly saturated with dye, working it into the fibers.
Consider flipping the fabric during the dyeing process to guarantee both sides receive adequate coverage. If using multiple colors, apply them liberally and blend at the edges.
Proper rinsing is also crucial; start with cold water and gradually increase the temperature to remove excess dye without causing colors to bleed.
Color Bleeding
Color bleeding is a common issue in tie-dye, particularly when using vibrant or reactive dyes. It occurs when dye molecules aren’t fully fixed to the fabric fibers during the setting process. To minimize bleeding, ensure a thorough initial rinse under cold water, gradually increasing the temperature;
Wash the dyed item separately for the first few washes to prevent color transfer to other clothes.
Using a color fixative can also help lock in the dye and reduce bleeding, enhancing the longevity of your vibrant tie-dye creations.
Faded Colors
Faded colors in tie-dye often result from insufficient dye penetration or improper dye setting. Ensure the fabric is thoroughly saturated with dye, applying it evenly and generously, especially in densely bound areas.
Allowing adequate setting time – typically 24-48 hours – is crucial for the dye to bond with the fibers.
Washing in cold water with a mild detergent will help preserve the vibrancy of your tie-dye, preventing premature fading and maintaining its colorful appeal.

Tie-Dye Inspiration & History
Japanese Shibori, particularly the Arimatsu technique, and vibrant African tie-dye traditions offer rich historical context and inspire diverse, colorful pattern possibilities.
Japanese Shibori Techniques (Arimatsu)
Arimatsu, a historic town in central Japan, is renowned as the birthplace of sophisticated tie-dyeing. For centuries, fabric merchant houses have lined its main street, showcasing incredible artistry.
Shibori encompasses various resist-dyeing methods, including binding, stitching, folding, twisting, and compressing fabric to create intricate patterns. These techniques often involve meticulous handwork and produce unique, textured designs.
Traditional Arimatsu Shibori frequently features elegant floral motifs and geometric patterns, reflecting a deep connection to nature and Japanese aesthetics. The process demands skill and patience, resulting in highly prized textiles.
African Tie-Dye Traditions
African tie-dye techniques represent a vibrant and sustainable approach to textile artistry, deeply rooted in cultural heritage. These traditions utilize natural dyes derived from plants, minerals, and other organic sources, minimizing environmental impact.
Methods vary across the continent, encompassing techniques like knotting, stitching, and folding to create diverse and captivating patterns. These practices often hold symbolic meaning, reflecting tribal affiliations and social status.
Revamping existing clothing through African tie-dye is a common practice, promoting resourcefulness and extending the lifespan of garments, embodying a commitment to mindful consumption.
Tie-Dye as a Sustainable Fashion Choice
Tie-dyeing promotes sustainability by revitalizing existing clothes and reducing textile waste, offering a creative alternative to fast fashion consumption.
Natural dyes and traditional methods further minimize environmental impact, aligning with eco-conscious values and responsible fashion practices.
Using Natural Dyes
Exploring natural dyes offers an eco-friendly approach to tie-dye, moving away from synthetic chemicals and embracing earth-derived pigments. African tie-dye traditions exemplify this beautifully, utilizing plants, fruits, and even mud to create vibrant, sustainable colors.
Consider experimenting with materials like turmeric for yellows, beetroot for pinks, or spinach for greens. While colorfastness can vary, natural dyes contribute to a lower environmental footprint and a unique, organic aesthetic. Researching local plant sources can further enhance this sustainable practice, connecting you to the natural world.
Revamping Existing Clothing
Tie-dye presents a fantastic opportunity to breathe new life into old or unwanted clothing items, promoting a more sustainable fashion cycle. Instead of discarding garments, transform them into unique, personalized pieces through the tie-dye process.
Old t-shirts, tote bags, and even denim can be revitalized with vibrant patterns. This practice reduces textile waste and encourages creativity, aligning with the growing trend of conscious consumption. It’s a cost-effective and environmentally friendly way to update your wardrobe!

Tie-Dye and Current Trends
Tie-dye’s popularity surged with work-from-home orders, becoming a comfortable and expressive WFH uniform, frequently showcased by influencers on platforms like Instagram.
The trend’s accessibility – requiring only white fabric, dye, and rubber bands – fueled its widespread adoption and creative experimentation.
Tie-Dye as WFH Fashion
The shift to remote work dramatically impacted fashion choices, with comfort and self-expression taking precedence. Tie-dye emerged as the unofficial uniform for many working from home, offering a vibrant and relaxed aesthetic perfectly suited for video calls and casual days.
Model Taylor Hill’s Instagram post exemplified this trend, showcasing tie-dye’s appeal beyond crafting and into mainstream fashion. This accessibility, combined with the desire for unique and personalized clothing, propelled tie-dye’s resurgence during the pandemic and beyond, solidifying its place in contemporary style.
Tie-Dye on Social Media (Influencer Impact)
Social media platforms, particularly Instagram and Pinterest, played a pivotal role in the tie-dye revival. Influencers showcased their creations, inspiring followers to experiment with the technique and share their own designs, creating a viral effect.
Pinterest boards dedicated to tie-dye exploded with ideas, ranging from simple tutorials to intricate patterns. TieDyeYourSummer.com benefited from increased visibility, becoming a go-to resource for enthusiasts seeking guidance and inspiration, further amplifying the trend’s reach.

Safety Precautions for Tie-Dyeing
Protect your skin and eyes with gloves during dyeing. Ensure adequate ventilation to avoid inhaling fumes, creating a safe and enjoyable tie-dye experience.
Protecting Your Skin and Eyes
Dyeing with Tulip dyes requires careful protection of your skin and eyes. Always wear gloves throughout the entire process, from preparing the dye to rinsing the finished product. This prevents skin irritation and staining, ensuring a comfortable experience.
Eye protection is equally crucial. Splashes of dye can cause significant irritation, so consider wearing safety glasses or goggles. If dye does come into contact with your eyes, rinse immediately with plenty of cool water and seek medical attention if needed.
Prioritizing these safety measures guarantees a fun and worry-free tie-dye adventure!
Ventilation
Adequate ventilation is essential when working with Tulip dyes. Dye fumes, while generally mild, can cause respiratory irritation in enclosed spaces. Always tie-dye in a well-ventilated area, such as outdoors or a room with open windows and a fan.
This ensures fresh air circulation, minimizing any potential discomfort. Proper ventilation also helps dissipate dye odors, creating a more pleasant working environment.
Prioritizing airflow contributes to a safer and more enjoyable tie-dyeing experience for everyone involved!

Resources for Further Learning
TieDyeYourSummer.com offers extensive tie-dye patterns and techniques. I Love to Create Tutorials provide step-by-step guidance for various designs, enhancing your skills.
TieDyeYourSummer.com
TieDyeYourSummer.com stands as a premier online destination for all things tie-dye, offering a comprehensive resource for both beginners and experienced enthusiasts. The website boasts a vast collection of 25 diverse tie-dye patterns, ranging from fundamental techniques to more intricate and advanced designs.
Visitors can access detailed instructions, inspiring visuals, and helpful tips to successfully execute a wide array of tie-dye projects. It’s a fantastic platform to explore tie-dye basics and delve into the artistry of creating unique, personalized textiles.
I Love to Create Tutorials
I Love to Create provides accessible and visually engaging tutorials, simplifying the tie-dye process for crafters of all levels. Their content focuses on classic techniques, such as the popular crumple method, offering a straightforward approach to achieving vibrant and unique designs on shirts and various fabrics.
These tutorials often include step-by-step photo guides, ensuring clarity and ease of understanding. They empower individuals to confidently experiment with tie-dye, fostering creativity and self-expression through textile art.