Article Plan: Nature Right 360 Incubator Instructions
This comprehensive guide details setup, operation, and troubleshooting for the Nature Right 360 incubator, ensuring successful hatching of chickens, ducks, and pheasants.
We’ll cover temperature and humidity control, automatic turning features, and essential monitoring techniques for optimal embryo development and hatch rates.
Learn how to reset the incubator, address common issues, and prepare for hatch day, maximizing your success with this user-friendly incubation system.
The Nature Right 360 incubator offers a convenient, all-in-one solution for hatching eggs, featuring automatic turning and precise climate control for optimal results.
Its 360-degree visibility allows easy egg monitoring, while its user-friendly design simplifies the incubation process for beginners and experienced poultry keepers alike.
Designed for chickens, ducks, and pheasants, this incubator provides a stable environment, promoting healthy embryo development and maximizing hatch rates consistently.
What is the Nature Right 360?
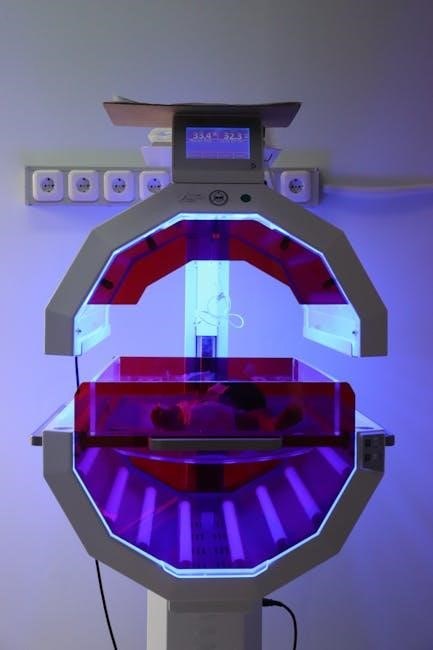
The Nature Right 360 is a technologically advanced egg incubator designed to replicate the natural brooding process, offering a reliable and efficient method for hatching chicks, ducklings, and pheasant poults. This incubator distinguishes itself through its comprehensive feature set, aimed at simplifying the incubation journey for both novice and seasoned poultry enthusiasts.
At its core, the Nature Right 360 provides a controlled environment where temperature and humidity are meticulously maintained, crucial factors for successful embryo development. The incubator’s capacity typically ranges from 12 to 22 eggs, making it suitable for small-scale hatching projects. A standout feature is the automatic egg turner, which gently rotates the eggs at pre-programmed intervals, mimicking a hen’s natural behavior and preventing the yolk from sticking to the shell membrane.
Furthermore, the incubator boasts a clear, 360-degree viewing window, allowing for constant observation of the eggs without disrupting the internal environment. This feature is particularly valuable for monitoring development and identifying any potential issues. The digital control panel offers precise adjustments for temperature and humidity, ensuring optimal conditions throughout the incubation period. It’s a complete system designed for ease of use and consistent, high-quality hatching results.
Key Features and Benefits
The Nature Right 360 incubator offers a multitude of features designed to maximize hatch rates and simplify the incubation process. A primary benefit is the automatic egg turning mechanism, which consistently rotates eggs, mirroring natural brooding and promoting healthy embryo development, eliminating the need for manual turning.
Precise temperature and humidity control are central to its success, ensuring a stable environment vital for embryo viability. The 360-degree visibility allows for effortless monitoring of egg development from any angle, without temperature fluctuations. The incubator intelligently stops the automatic turning function three days before the expected hatch date, allowing chicks to properly position themselves.
Furthermore, the digital control panel provides intuitive adjustments and clear readouts. A valuable safety feature is the ability to reset the incubator with a simple button combination, addressing potential operational glitches. Ultimately, the Nature Right 360 delivers convenience, reliability, and a higher probability of successful hatching for chickens, ducks, and pheasants.
Intended Use: Chickens, Ducks, and Pheasants
The Nature Right 360 incubator is specifically engineered for the successful incubation of chicken, duck, and pheasant eggs. Its versatile design and adjustable settings cater to the unique incubation requirements of each species, offering a reliable solution for poultry enthusiasts and breeders.
While adaptable, it’s crucial to understand that optimal results are achieved when adhering to species-specific incubation periods and humidity levels. The incubator’s temperature control system allows for precise adjustments necessary for each bird type. Whether you’re hatching delicate pheasant eggs or robust chicken eggs, the Nature Right 360 provides a consistent and controlled environment.
It’s important to note that while primarily designed for these three types of poultry, experimentation with other species may require advanced knowledge and careful monitoring. The incubator’s features, like automatic turning and humidity control, are optimized for chickens, ducks, and pheasants, ensuring the highest hatch rates.

Getting Started: Initial Setup
Proper setup is vital for success! This section guides you through selecting an ideal location, assembling the incubator, and verifying initial power-on functionality.
Choosing the Right Location
Selecting the appropriate location for your Nature Right 360 incubator is a crucial first step towards successful hatching. The ideal spot should maintain a consistent ambient temperature, ideally between 65°F and 80°F (18°C ⎻ 27°C), avoiding drastic fluctuations.
Avoid placing the incubator in direct sunlight, near drafts, or in high-traffic areas. These conditions can disrupt temperature and humidity levels, negatively impacting embryo development. A quiet, stable room, away from external disturbances, is highly recommended.
Ensure the surface is level and sturdy to prevent accidental tipping. Consider proximity to a grounded electrical outlet for reliable power. Also, think about accessibility for easy monitoring and egg handling throughout the incubation period. A dedicated space minimizes potential disruptions and allows for focused observation of the hatching process.
Assembling the Incubator
The Nature Right 360 incubator arrives with several components requiring careful assembly. Begin by unpacking all parts and verifying their presence against the included parts list. The base forms the foundation; securely attach the side panels, ensuring they click firmly into place.
Next, position the clear viewing window, aligning it with the designated slots and securing it properly. Install the automatic turner mechanism, following the diagram in the manual – this is vital for consistent egg rotation. Ensure the turner motor is correctly connected.
Finally, place the water trays and egg trays inside the incubator. Double-check all connections and ensure a snug fit for each component. A properly assembled incubator provides a stable and controlled environment for optimal hatching success. Refer to the manual’s illustrations for visual guidance throughout the process.
Powering On and Initial Display Check
Once assembled, connect the Nature Right 360 incubator to a stable power source. Upon powering on, the digital display should illuminate, initiating a self-test sequence. Observe the display for any error messages or unusual readings. The primary temperature readout (typically in red) should appear, indicating the current internal temperature.
Verify that the humidity readout is also functioning correctly. The display should cycle through various settings, confirming the operational status of the incubator’s controls. If any abnormalities are detected during the initial display check, consult the troubleshooting section of the manual before proceeding.
Allow the incubator to run for a short period to stabilize before making any temperature or humidity adjustments. This ensures accurate readings and a consistent environment for successful incubation.

Temperature Control
Maintaining precise temperature is crucial for successful hatching. Utilize the incubator’s controls and external thermometers like Govee for accurate monitoring and adjustments.
Understanding Temperature Readouts
The Nature Right 360 incubator displays temperature on a red digital readout. This reading represents the temperature inside the incubator, measured by the unit’s internal sensor. However, relying solely on this reading isn’t always sufficient for optimal results. It’s vital to understand that the temperature displayed is the set point, not necessarily the actual temperature experienced by the eggs.
Therefore, verifying the temperature with an external thermometer is highly recommended. Many users successfully employ Govee thermometers, placing the sensor near the eggs to obtain a more accurate reading of the egg’s environment. Discrepancies between the incubator’s readout and the external thermometer are common, and adjustments should be made based on the external reading.
Remember to account for temperature fluctuations caused by opening the incubator. Frequent opening can disrupt the internal climate, so minimize access during incubation. Consistent monitoring and adjustments, guided by a reliable external thermometer, are key to maintaining the ideal temperature range for healthy embryo development.
Adjusting the Temperature
To adjust the temperature on your Nature Right 360 incubator, utilize the “+/–” buttons located on the control panel. These buttons directly modify the red temperature readout, which represents the target temperature inside the unit. Small adjustments are crucial; avoid making large, sudden changes, as this can stress the developing embryos.
Continuously monitor the temperature using an external thermometer, like a Govee, placed near the eggs. If the Govee reading differs from your desired temperature, incrementally adjust the incubator’s set point using the “+/–” buttons until the readings align. Patience is key – allow sufficient time (several hours) for the incubator to stabilize after each adjustment.
Remember that consistent temperature is paramount. Avoid frequent adjustments and strive for a stable environment within the recommended range for the specific bird species you are incubating. Regular observation and fine-tuning will ensure optimal hatching success.
Using External Thermometers (Govee) for Verification
Employing an external thermometer, such as a Govee, is highly recommended to verify the accuracy of the Nature Right 360’s internal temperature readings. While the incubator features built-in sensors, external validation provides an extra layer of assurance for consistent and reliable temperature control.
Position the Govee thermometer probe as close as possible to the eggs, without directly touching them. This ensures you’re measuring the temperature within the egg’s immediate environment. Compare the Govee’s reading to the temperature displayed on the incubator’s control panel.
If discrepancies exist, adjust the incubator’s temperature settings using the “+/–” buttons until the Govee reading matches your desired temperature. This cross-referencing method guarantees a more precise incubation environment, maximizing hatch rates and promoting healthy chick development. Consistent verification is crucial throughout the incubation period.
Humidity Control
Maintaining correct humidity is vital for successful hatching; The Nature Right 360 allows precise humidity adjustments, crucial for proper embryo development and preventing dehydration.
Importance of Humidity Levels
Humidity plays a critical role throughout the incubation process, directly impacting the health and development of the embryos. Too low humidity can cause excessive moisture loss from the eggs, leading to stuck chicks and reduced hatch rates. Conversely, excessively high humidity can impede oxygen exchange through the shell, potentially drowning the developing embryo.
During the initial stages of incubation, lower humidity levels (around 30-50%) are generally recommended to allow for proper gas exchange. As the embryos develop and the air cell within the egg grows, humidity needs to be gradually increased.
In the final days leading up to hatch (lockdown), humidity should be raised significantly (65-75%) to soften the shell membranes, making it easier for the chicks to pip and hatch successfully. Precise humidity control ensures optimal conditions for healthy chick development and a higher hatch percentage with the Nature Right 360.
Adjusting Humidity Settings
The Nature Right 360 allows for precise humidity control via the control panel. To adjust the humidity level, locate the humidity setting buttons (typically marked with “+” and “-“) on the incubator’s interface. Pressing the “+” button will increase the humidity percentage displayed on the screen, while the “-” button will decrease it.
Water is added to the incubator to generate humidity. Typically, this involves filling designated water reservoirs or channels within the unit. Monitor the water level regularly and replenish as needed, ensuring the humidity remains within the desired range.
It’s crucial to verify the humidity reading using a separate hygrometer, such as a Govee device, to ensure accuracy. Slight adjustments may be necessary to calibrate the incubator’s internal sensor and maintain optimal humidity levels throughout the incubation period for successful hatching.
Maintaining Proper Humidity Throughout Incubation
Consistent humidity is vital for successful hatching. During the initial stages of incubation, maintaining humidity around 50-55% is generally recommended. As the eggs develop, gradually increase the humidity to 65-75% approximately three days before the expected hatch date.
Regularly monitor water levels in the incubator’s reservoirs and replenish as needed. Evaporation rates vary depending on ambient temperature and ventilation. Check at least once daily, and potentially more often during warmer periods.
Observe the air cells within the eggs during candling. Proper humidity prevents the air cell from becoming too large or too small. Use a calibrated hygrometer to verify the incubator’s humidity reading and make adjustments as necessary to ensure optimal embryo development and a healthy hatch.

Automatic Egg Turning
The Nurture Right 360 features an automatic turner, gently rotating eggs to mimic a brooding hen, promoting healthy embryo development and boosting hatch rates.
This eliminates manual turning and automatically stops three days before hatching, allowing chicks to position themselves for successful emergence.
How the Automatic Turner Works
The Nature Right 360’s automatic egg turner is designed to replicate the natural movements of a hen diligently tending to her eggs. This system utilizes a gently rocking motion, tilting the eggs from side to side at predetermined intervals. This consistent rotation is crucial for preventing the developing embryo from sticking to the shell membrane, ensuring proper nutrient distribution, and fostering healthy development.
The turner operates on a timed cycle, typically turning the eggs every one to two hours. This frequency is optimized to provide sufficient movement without causing undue stress to the developing embryos. The eggs are securely held within the turner tray, preventing them from shifting or falling during the rotation process.
The mechanism is relatively simple, relying on a small motor and a carefully calibrated rocking arm. This design ensures reliable operation throughout the majority of the incubation period. It’s important to ensure the turner is properly installed and functioning correctly to maximize its benefits. Regular visual checks can confirm smooth and consistent operation.
Benefits of Automatic Turning
Automatic egg turning offers significant advantages over manual turning, dramatically increasing hatch rates and simplifying the incubation process. By consistently rotating the eggs, the automatic turner prevents the yolk and embryo from settling against the shell, which can restrict nutrient absorption and hinder development.
This consistent movement mimics a broody hen’s natural behavior, creating an optimal environment for embryo growth. It eliminates the risk of human error associated with inconsistent or infrequent manual turning, ensuring each egg receives the necessary stimulation.
Furthermore, automatic turning frees up valuable time and reduces the workload for the incubator operator. You no longer need to interrupt incubation multiple times daily to manually turn the eggs. The Nurture Right 360’s auto-turn feature stops automatically three days before hatching, allowing chicks to position for pipping, further boosting success.
Turner Stopping Before Hatch Day
The automatic turner on the Nature Right 360 is intelligently designed to cease operation a few days prior to the anticipated hatch date – typically three days. This crucial feature isn’t a malfunction, but a deliberate function vital for successful hatching.
As chicks develop, they require a stable position to properly orient themselves for pipping and hatching. Continued turning during this stage can disrupt their positioning and potentially lead to complications. By stopping the turner, the chicks are given the necessary time and space to prepare for emergence.
This automated process eliminates the need for manual intervention and ensures the chicks are in the optimal position for a smooth hatch. Do not attempt to restart the turner once it has stopped; allowing the chicks to settle is paramount. This feature significantly boosts hatch rates and minimizes potential issues during the final stages of incubation.
Monitoring and Troubleshooting
Regularly observe eggs via the 360-degree view; reset the incubator by holding ‘Menu’ and ‘-’ for five seconds.
Address issues promptly using the guide, ensuring optimal incubation conditions for healthy chick development and successful hatching.
360-Degree Visibility for Egg Monitoring
The Nature Right 360 incubator boasts a remarkable feature: complete 360-degree visibility. This innovative design allows for effortless monitoring of your developing eggs from any angle, without the need to disturb the delicate incubation environment. The clear window provides an unobstructed view, enabling you to observe embryo development and identify any potential issues without opening the incubator and causing fluctuations in temperature or humidity.
Regular visual checks are crucial for ensuring healthy development. You can observe egg turning, check for clear air cells, and monitor for any signs of problems. This feature eliminates the guesswork often associated with incubation, providing peace of mind and increasing your chances of a successful hatch. The ability to view eggs from all sides is particularly helpful when candling, allowing for a comprehensive assessment of embryo viability.
This enhanced visibility promotes a more engaged and informed incubation experience.
Resetting the Incubator
Occasionally, you may need to reset your Nature Right 360 incubator to restore optimal functionality or clear error messages. The process is straightforward and designed for ease of use. To initiate a reset, simultaneously press and hold both the “Menu” and the “-” (minus) buttons for a duration exceeding five seconds.
Upon successful completion of the reset, the incubator will emit an audible beep. Additionally, the display screen will briefly blink once, visually confirming that the reset procedure has been executed correctly. This indicates that the incubator’s internal settings have been returned to their default configuration, ready for a new incubation cycle or adjustments.
Resetting can resolve minor operational glitches and ensure accurate readings. It’s a useful troubleshooting step if you encounter unexpected behavior or inconsistencies in temperature or humidity displays.
Common Issues and Solutions
Despite its reliability, you might encounter minor issues with your Nature Right 360 incubator; A frequent concern is temperature discrepancies between the incubator’s readout and an external thermometer, like a Govee. Adjust the incubator’s temperature using the “+/-” buttons, referencing the external thermometer for accurate calibration.
If the incubator fails to respond, attempt a reset by holding the “Menu” and “-” buttons for over five seconds – this often resolves temporary glitches. Ensure the power cord is securely connected and the outlet is functioning correctly.
Humidity fluctuations can occur; regularly check and adjust the water reservoirs. If automatic turning malfunctions, verify the turner is properly assembled and functioning before hatch day. Consistent monitoring and prompt attention to these issues will ensure a successful hatch.
Incubation Periods and Hatching
Different bird species require varying incubation durations; chickens typically need 21 days, while ducks and pheasants have longer periods.
Prepare for hatch day by ceasing egg turning three days prior and increasing humidity for easier pipping and successful chick emergence.
Incubation Periods for Different Bird Types
Understanding the specific incubation period for your chosen bird species is crucial for successful hatching with the Nature Right 360 incubator. While the incubator provides a controlled environment, knowing the correct duration ensures optimal embryo development.
Chickens generally require an incubation period of 21 days. Maintaining consistent temperature and humidity throughout these three weeks is paramount.
Ducks, on the other hand, have a longer incubation period, typically ranging from 28 to 35 days, depending on the breed. Increased humidity levels are particularly important during the final week for ducklings to hatch successfully.
Pheasants also necessitate a longer incubation timeframe, usually around 23 to 25 days. Careful monitoring of humidity and temperature is vital, as pheasant embryos can be more sensitive to fluctuations.
Always refer to breed-specific guidelines when available, as slight variations can occur. Accurate tracking of the incubation start date is essential to anticipate hatch day and prepare accordingly.
Preparing for Hatch Day
As hatch day approaches – typically around day 18 for chickens, and later for ducks and pheasants – several preparations are essential for a smooth hatching process with your Nature Right 360 incubator. The automatic turner will cease operation three days prior to the expected hatch, allowing chicks to orient themselves for pipping.
Increase humidity levels significantly during the final 72 hours. This softens the eggshells, aiding the chicks in breaking free. Avoid opening the incubator unnecessarily to maintain stable conditions.
Remove the egg turner entirely to provide ample space for hatching. Ensure the incubator remains undisturbed during this critical period. Resist the urge to assist chicks; intervention can often be detrimental.
Prepare a brooder with appropriate heat and food sources, ready to receive the newly hatched chicks once they are dry and fluffy. Patience is key; hatching can take up to 24-48 hours.
Post-Hatch Care and Monitoring
Once the majority of chicks have hatched, allow them to remain in the incubator until fully dry and fluffy. This typically takes several hours, providing a safe and warm environment. Carefully transfer the chicks to a prepared brooder, ensuring it’s appropriately heated and equipped with food and water.
Monitor the chicks closely for the first few days, observing their eating, drinking, and activity levels. Ensure they are not huddling together due to cold or spreading out due to overheating. Adjust the brooder temperature accordingly.
Clean the incubator thoroughly after each hatch, disinfecting all surfaces to prevent the spread of disease. Inspect the turner and other components for any damage or wear.
Record your incubation results – hatch rates, any issues encountered – to refine your technique for future hatches with your Nature Right 360 incubator.